How to Create AI-Powered Videos with Google Flow: Brainstorm, Edit, and Share
Google Flow emerged as a standout announcement at last year's I/O event, and its latest updates at this year's conference have only amplified its appeal. This AI-driven creative studio lets you generate, refine, and iterate professional-quality videos using nothing more than natural language prompts—all within a unified workspace. A year after its debut, Flow now boasts agentic brainstorming for sparking ideas, more precise editing tools for granular control, and enhanced sharing features for seamless collaboration. Whether you're a marketer crafting social clips, an educator explaining concepts, or a creator experimenting with visual storytelling, this guide walks you through harnessing these capabilities step by step.
What You Need
- A Google account (personal or Workspace) with access to Google Flow (available via Google Labs or the Workspace Labs waitlist)
- A stable internet connection
- Basic familiarity with video concepts (desired style, length, and format)
- Optional: a script or storyboard outline for more targeted generation
Step-by-Step Guide
Step 1: Access and Set Up Google Flow
Navigate to the Google Flow web app (flow.google.com) and sign in with your Google account. If you're not yet on the waitlist, request access through the Flow home page. Once admitted, you'll land on a clean dashboard with a prompt input box and a library of your projects. For first-time users, take a moment to explore the interface—notice the Brainstorm tab in the left sidebar (newly added for agentic idea generation) and the timeline editor below the preview window.
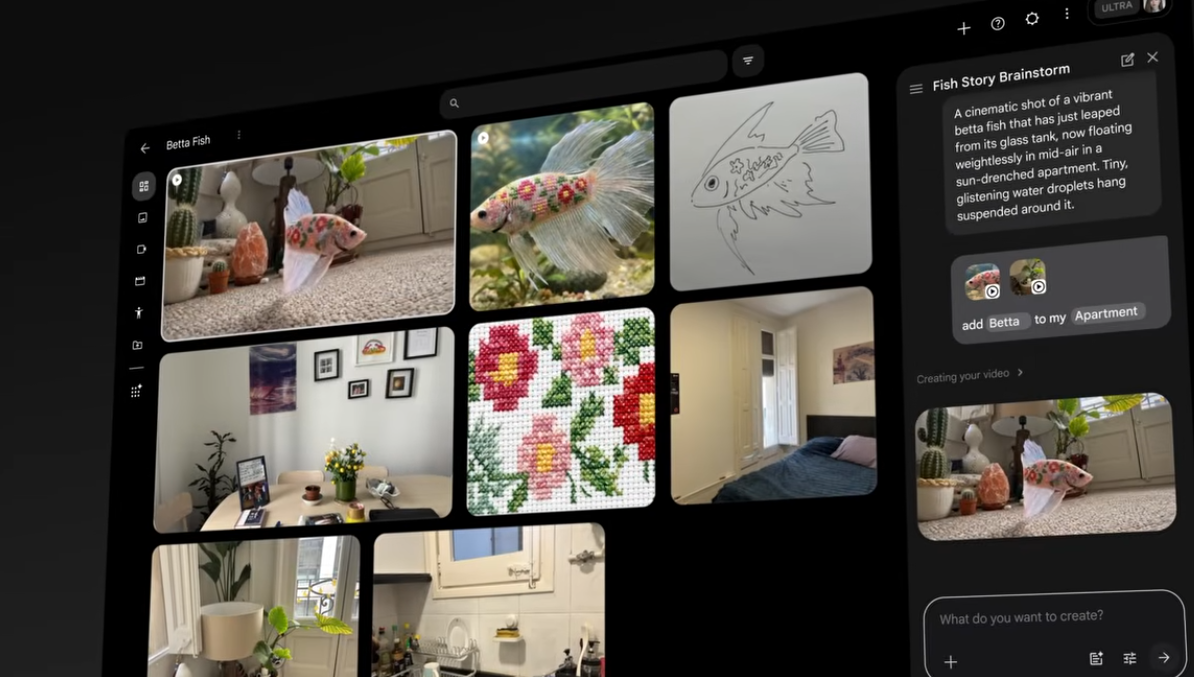
Step 2: Generate Video Concepts with Agentic Brainstorming
Instead of starting from scratch, click the Brainstorm tab to invoke Flow's agentic idea engine. Describe your topic in a sentence or two (e.g., "summer travel vlog for Instagram"). The AI will suggest multiple angles, visual styles, and even rough storyboards. Browse the suggestions and click one that resonates—it pre-fills the main prompt field with a structured concept, including mood, pacing, and key scenes. You can tweak these parameters directly. This step saves hours of manual ideation and ensures your video aligns with current trends and audience preferences.
Step 3: Create Your Initial Video Draft
With a concept locked in, hit Generate in the main prompt area. Flow processes your request using a combination of text-to-video, image-to-video, and descriptive model outputs. In about 45–90 seconds (depending on length and complexity), you'll see a rough cut appear in the preview window. Don't expect perfection—this is a raw draft. Use the playback controls to watch it through, noting sections that need trimming, color grading, or alternate takes. The timeline below shows each scene as a separate clip, which you can select individually for editing.
Step 4: Refine with Precise Editing Tools
Click on any clip in the timeline to open the editing panel. Here you'll find the newly improved precise editing tools:
- Trim & Split – Drag the edges to shorten or lengthen a segment. Use the scissor icon to split a clip into two for independent manipulation.
- Style Transfer – Apply a specific aesthetic (e.g., film noir, vintage VHS, cinematic warm) to a single clip or the entire sequence with a slider for intensity.
- Motion Correction – If a clip is shaky, enable stabilization. For static shots, add automated camera movement (pan, zoom, rotate) with adjustable speed.
- Prompt Re‑roll – Highlight a clip and type a new prompt (e.g., "make this scene at sunset instead") to regenerate only that segment while keeping the rest intact.
- Audio Mix – Adjust background music volume, add voiceover (type or paste text for AI narration), or replace ambient sounds with AI‑generated effects.
Take advantage of the undo button to experiment fearlessly. Each change is non‑destructive, so you can revert to any previous version.

Step 5: Iterate and Fine‑Tune
One of Flow's strongest features is iteration. After making edits, use the Compare Versions button in the toolbar to side‑by‑side view the original draft and your current version. If something feels off, try the Variations option: for a selected clip, Flow generates three alternate takes based on the same prompt but with slight variation in composition or movement. Pick the best one and continue. You can also chain multiple edits together—for instance, apply a style transfer, then adjust motion, then replace the background – and see the cumulative effect in real time.
Step 6: Share and Collaborate
Once your video is polished, click the Share button in the top‑right corner. The new sharing features let you:
- Generate a public link that plays in any browser without requiring a Flow account.
- Send a private invite to team members who can view, comment, or edit (choose permissions per person).
- Export the final video in MP4 (1080p at 30fps) or as an animated GIF for social media snippets.
- Embed the video directly into Google Docs or Slides via a new integration.
For collaborative projects, use the Comments pane to tag colleagues on specific timestamps. Flow also logs an edit history that shows who changed what and when, making it easy to roll back if a collaborator's tweak goes awry.
Tips for Best Results
- Start with a strong description. The more detailed your initial prompt (e.g., "a 30‑second product demo for a smart water bottle with a sleek, minimalist style and upbeat background music"), the less editing you'll need later.
- Use brainstorming as a springboard. Even if you have a clear vision, run it through the agentic brainstormer—it often surfaces creative angles you hadn't considered.
- Edit in small batches. Make one change at a time and preview. Rushing through multiple edits can lead to messy results that are hard to undo.
- Leverage prompt re‑roll sparingly. It's powerful for fixing one scene, but regenerating too many clips can break consistency. Instead, use style transfer to unify the look.
- Test sharing permissions. Before sending a collaborative link, double‑check that your privacy settings align with your project's sensitivity. Use view‑only links for client reviews.
- Export at the highest quality. For professional use, always export MP4. GIFs are handy for quick previews but lose color depth and smoothness.
Google Flow continues to evolve, and these new features—agentic brainstorming, more precise editing, and streamlined sharing—make it an even more compelling tool for anyone who wants to produce high‑quality video content without traditional editing expertise. Whether you're a solo creator or part of a team, the steps above will help you get the most out of this AI‑powered studio.
Related Articles
- ACEMAGIC Revamps F5A Mini PC: Ryzen AI HX 470 Boosts Storage and Connectivity
- 10 Essential Insights into Docker AI Governance for Safe Agent Autonomy
- 5 Key Takeaways from Daniel Stenberg's Evaluation of Anthropic's Mythos AI
- Harnessing Design Principles for Team Alignment and Product Excellence
- From Berlin Side Project to $5.2B Valuation: How n8n Became SAP's Orchestration Layer
- AI Clones: A Comprehensive Guide to Ethical Implementation and Risk Mitigation
- The Unintended Consequences of the GUARD Act: How Age-Gating Could Cripple Everyday Online Tools
- Apache Camel Unleashes Game-Changing Observability Upgrades for Java Developers